

Ibe’s Image Processing Notes
 on [Unsplash](https://unsplash.com?utm_source=medium&utm_medium=referral)](https://cdn-images-1.medium.com/max/8000/0*PHrRPAafwhLasABh.)
While I’m on my last semester in Telkom University, I attended the Research Group in Multimedia Laboratory. The research we’ve been doing is about Digital Image Processing and Computer Vision. Almost every week, we met and learn about DIP and doing some assignment.
The second assignment, was about image conversion.
But before we jump to the idea about image conversion, why we should learn about it?
Importance of learning color conversion
Well, after doing some research on the internet and digital image processing’s books, I have some reasons.
First, sometimes processing images on color images (usually on RGB) may takes a long time. That’s why, before applied on color images, some algorithm tested or applied on grayscale images or binary images. Or we can say that some algorithm is having big complexity when processed on color images rather than grayscale or binary images.
The second, each color model have their own purposes and advantages. For example, there are several kind of color model, like CMYK that used for printing, Lab which designed to approximated human vision, color image with transparation (RGBA) used for graphic design, and so on.
There are so many reasons to learn about color conversion, I think there are many sources that discuss more further about it. The fact that different color spaces are better for different applications are interesting to consider.
Color Conversion
When we talk about conversing an image from a color space to another color space, we absolutely talked about mathematics equation.
In this article, I will discuss about three color conversion from RGB image. But before we jump to the code, please make sure you have Python 2.7 and OpenCV for Python installed on your machine. I’ll provide codes with two different approaches, using the OpenCV library and without the OpenCV library.
RGB to Grayscale
We can convert RGB image using this equation :
 RGB to Grayscale equation
How it’s work : The big difference between RGB image and Grayscale image is their color channel. RGB image have 3 channels, while Grayscale image only have 1 channel. We take the i-th pixel of channel Red, Green, and Blue then use the equation above to calculate the value at i-th pixel at the Grayscale image. Here’s the implementation in Python.
"""
@author : Ida Bagus Dwi Satria Kusuma - @dskusuma
Notes   :
There are two kind of solutions. The first is solution using the Open-CV's
library. The second is without the library.
"""

import numpy as np
import cv2

# Read color image
img = cv2.imread('gambar1.jpg')

# Get the image's height, width, and channels
height, width, channel = img.shape

# Create blank grayscale image
img_grayscale = np.zeros((height,width,1))

# ======================================================
# IMPLEMENTATION USING OPENCV LIBRARY
# ======================================================
#  img_grayscale = cv2.cvtColor(img, cv2.COLOR_BGR2GRAY)

# ======================================================
# IMPLEMENTATION WITHOUT OPENCV LIBRARY
# ======================================================

# CALCULATE
for i in np.arange(height):
    for j in np.arange(width):
        r = img.item(i,j,0)
        g = img.item(i,j,1)
        b = img.item(i,j,2)

        # RGB to Grayscale
        y = 0.299*r + 0.587*g + 0.144*b

        img_grayscale.itemset((i,j,0),int(y))

# Write image
cv2.imwrite('image_grayscale.jpg',img_grayscale)
# View image
cv2.imshow('image',img_grayscale)
cv2.waitKey(0)
cv2.destroyAllWindows()
RGB to Binary Image
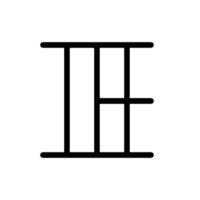
To convert RGB image to Binary image, we have to the RGB image into Grayscale image first. Then we set threshold value. Then we use this equation :
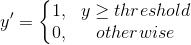 RGB to Binary equation
How it’s work : We iterate on every pixel in our RGB image. If the pixel’s value is below the threshold value, we set it as 0, otherwise we set it as 1. Here’s the implementation in Python.
"""
@author : Ida Bagus Dwi Satria Kusuma - @dskusuma
Notes   :
There are two kind of solutions. The first is solution using the Open-CV's
library. The second is without the library.
"""

import numpy as np
import cv2

# Read color image
img = cv2.imread('gambar1.jpg')

# Get the image's height, width, and channels
height, width, channels = img.shape

# Create blank Binary Image
img_binary = np.zeros((height,width,1))

# Create grayscale image
img_grayscale = cv2.cvtColor(img, cv2.COLOR_BGR2GRAY)
# print img_grayscale.shape
# ======================================================
# IMPLEMENTATION USING OPENCV LIBRARY
# ======================================================
(thresh, img_binary) = cv2.threshold(img_grayscale, 128, 255, cv2.THRESH_BINARY | cv2.THRESH_OTSU)

# ======================================================
# IMPLEMENTATION WITHOUT OPENCV LIBRARY
# ======================================================
# Set Threshold
# thresh = 120
# CALCULATE
# for i in np.arange(height):
#     for j in np.arange(width):
#         x = img_grayscale.item(i,j)
#         if x >= thresh:
#             y = 1
#         else :
#             y = 0

#         img_binary.itemset((i,j,0),int(y))

# Write image
cv2.imwrite('image_binary.jpg',img_binary)
# View image
cv2.imshow('image',img_binary)
cv2.waitKey(0)
cv2.destroyAllWindows()
RGB to HSV
The first step to convert RGB to HSV is to divide each channel with 255 to change the range of color from 0..255 to 0..1 :


Then we calculate the Cmax, Cmin, and Delta :


After that, we ready to calculate the Hue, Saturation, and Value using this equation :
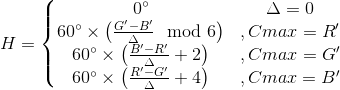 Hue Calculation
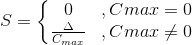 Saturation Calculation
 Value Calculation
How it’s work : After we calculate the HSV for the i-th pixel of RGB image, we take the H, S, and V to form 3-channel image. Here’s the implementation on Python
"""
@author : Ida Bagus Dwi Satria Kusuma - @dskusuma
Notes   :
There are two kind of solutions. The first is solution using the Open-CV's
library. The second is without the library.
"""

import numpy as np
import cv2

# Read color image
img = cv2.imread('gambar1.jpg')

# Get the image's height, width, and channels
height,width,channel = img.shape

# Create balnk HSV image
img_hsv = np.zeros((height,width,3))

# ======================================================
# IMPLEMENTATION USING OPENCV LIBRARY
# ======================================================
# img_hsv = cv2.cvtColor(img, cv2.COLOR_BGR2HSV)

# ======================================================
# IMPLEMENTATION WITHOUT OPENCV LIBRARY
# ======================================================

# CALCULATE
for i in np.arange(height):
    for j in np.arange(width):
        r = img.item(i,j,0)
        g = img.item(i,j,1)
        b = img.item(i,j,2)

        r_ = r/255.
        g_ = g/255.
        b_ = b/255.
        Cmax = max(r_,g_,b_)
        Cmin = min(r_,g_,b_)
        delta = Cmax-Cmin

        # Hue Calculation
        if delta == 0:
            H = 0
        elif Cmax == r_ :
            H = 60 * (((g_ - b_)/delta) % 6)
        elif Cmax == g_:
            H = 60 * (((b_ - r_)/delta) + 2)
        elif Cmax == b_:
            H = 60 * (((r_ - g_)/delta) + 4)

        # Saturation Calculation
        if Cmax == 0:
            S = 0
        else :
            S = delta / Cmax

        # Value Calculation
        V = Cmax

        # Set H,S,and V to image
        img_hsv.itemset((i,j,0),int(H))
        img_hsv.itemset((i,j,1),int(S))
        img_hsv.itemset((i,j,2),int(V))

# Write image
cv2.imwrite('image_hsv.jpg', img_hsv)

# View image
cv2.imshow('image', img_hsv)
cv2.waitKey(0)
cv2.destroyAllWindows()
The conclusion is learning about image conversion and color space is really important to help us understanding the concept of digital image processing. I really wish this article will help you.
See you on the next article! Happy code!